
What Is Fixing Tape on Drywall and Why It Matters
The process of fixing tape on drywall is more than just covering a seam. It’s about reinforcing the joints between drywall panels to prevent cracks, bubbling, or lifting that can ruin a smooth finish. Properly installed tape ensures structural stability and a flawless look that lasts.
Drywall panels may fit together neatly, but the seams always need reinforcement. Tape serves as the backbone of the joint, allowing for a perfectly even surface that’s ready for paint.
If you prefer a professional touch, a drywall contractor has the experience, tools, and precision to make sure your taped joints stay perfect for years.
Recommended Tools and Materials
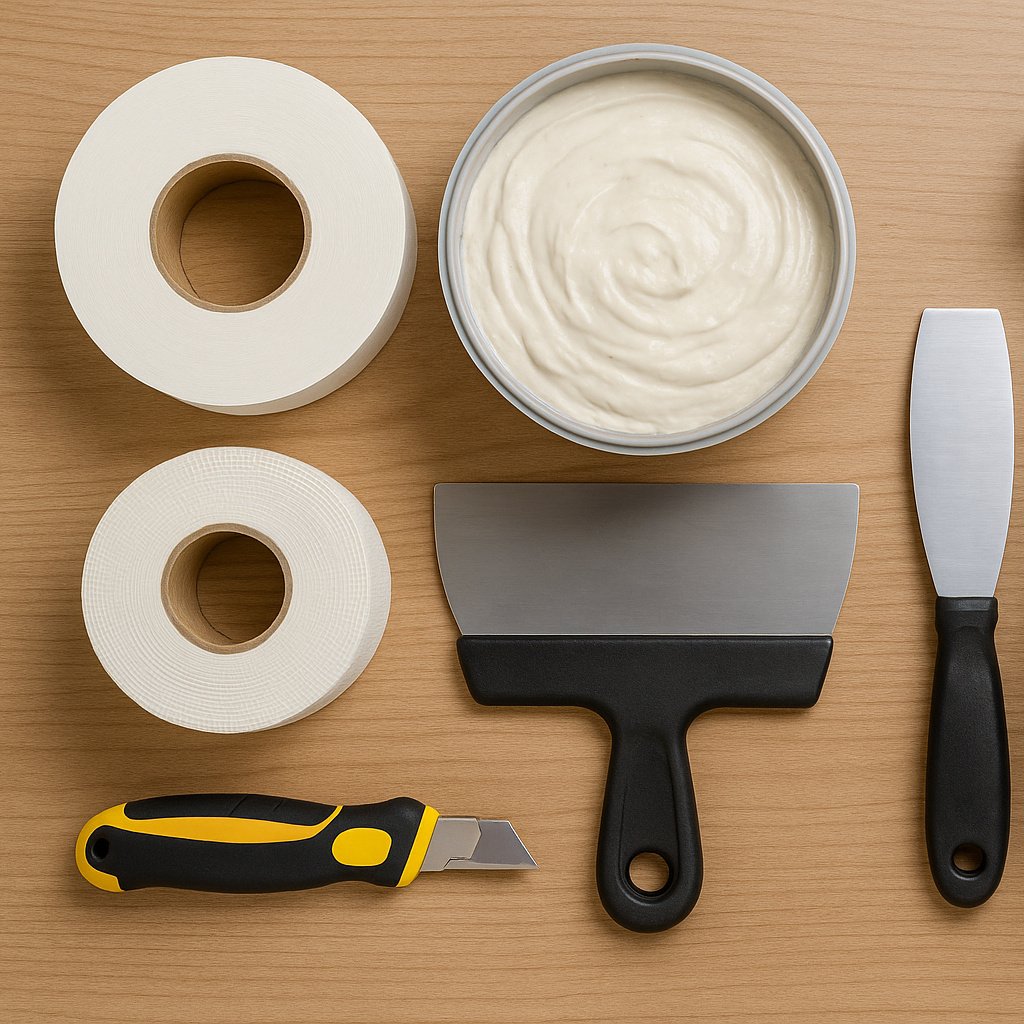
For successful fixing tape on drywall, you’ll need the right materials and equipment:
- Joint tape – reinforced paper or fiberglass mesh.
- Joint compound – base coat and finishing types.
- Taping knives and trowels – stainless steel for smooth application.
- Sander – manual or electric, for a refined finish.
- Utility knife – to cut and remove damaged tape.
🔍 Paper Tape vs Mesh Tape: Which One Should You Use?
This is one of the biggest questions people have when starting drywall repairs.
Paper Tape:
- Best for inside corners and standard wall seams.
- Stronger hold when embedded properly in joint compound.
- Requires a bit more finesse.
Mesh Tape (Fiberglass):
- Self-adhesive and great for flat seams and quick fixes.
- Excellent for patching small holes or cracks.
- Not ideal for corners.
💡 Pro Tip: We often use mesh tape on large flat repairs where speed matters — and believe me, the tape is so well positioned you can’t even tell it was ever patched.
Top Drywall Tape Brands
Professionals often turn to trusted brands for consistent results:
- SHEETROCK (USG) – classic paper tape with strong bonding.
- FibaTape (Saint-Gobain ADFORS) – fiberglass mesh, self-adhesive, mold-resistant.
- ProForm Paper Tape – durable and easy to apply.
- BEADEX – excellent adhesion and long life.
- Strait-Flex Crack-Tape / Tuff-Tape – designed to resist cracks and deformation.
Selecting the right tape for the project is key to avoiding future repairs.
🔨 Step-by-Step: How to Use Drywall Repair Tape Correctly
Let’s break it down so you can get pro-level results — even if it’s your first time.
✅ 1. Prepare the Surface
Clean, dry, and dust-free.
If there’s old, damaged tape or flaky paint, remove it with a utility knife or scraper. Lightly sand the area to give your compound a better grip.
When we prep walls, it’s precise and fast. The surface is fully ready before the tape ever touches it — and that’s key.
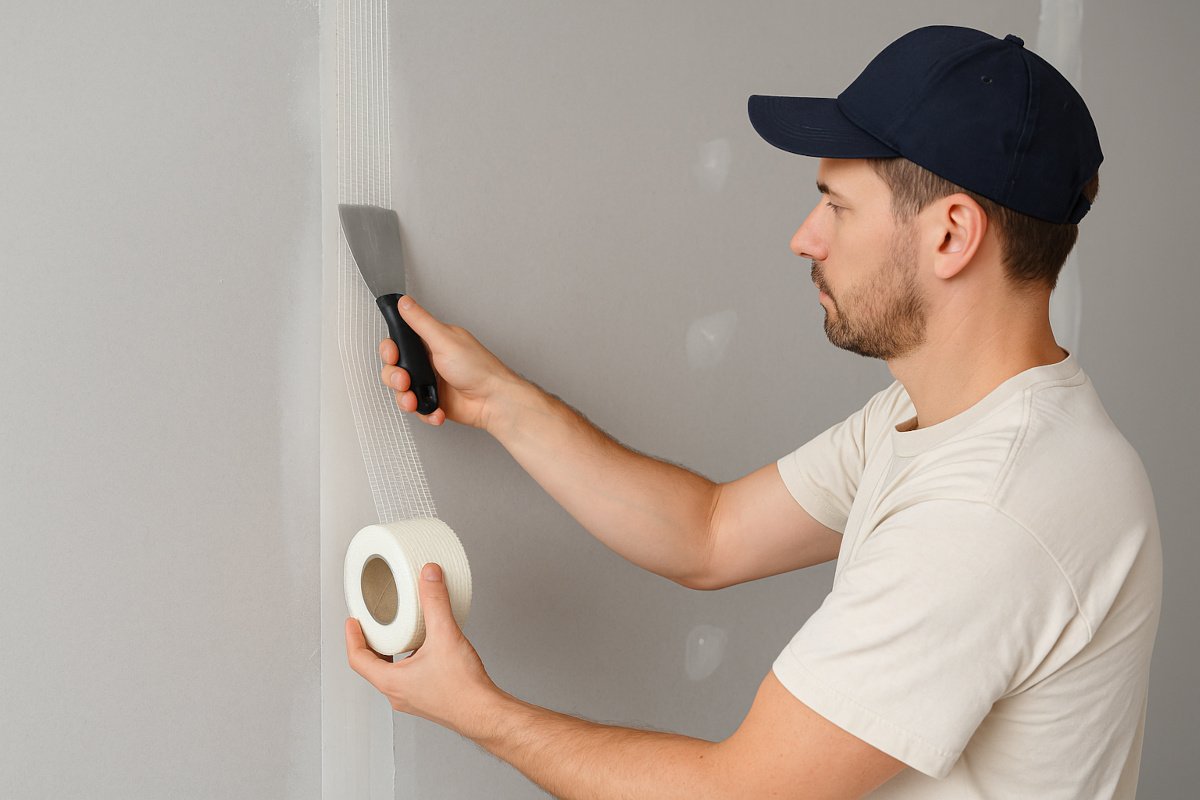
✅ 2. Apply the Tape
For mesh tape:
- Simply stick it over the crack or seam.
- Make sure it’s centered and smooth — no wrinkles.
For paper tape:
- First, spread a thin coat of joint compound.
- Crease the paper for corners, then embed it into the mud using a 6″ knife.
- Press from the center outward to remove bubbles.
👉 I’ve seen people rush this step and end up with tape peeling or bubbling later. Our team moves fast, yes, but the placement is so clean and precise that once the tape is on, you’d think it was part of the wall.
✅ 3. Apply First Coat of Mud
- Spread joint compound over the tape, feathering the edges.
- For mesh tape, use multiple light coats because it doesn’t absorb mud like paper does.
- Let it dry completely — at least 12 hours.
This is where a lot of DIYers go wrong — applying too much at once. Our guys do it fast, but their control is amazing. The tape becomes invisible once dry — that’s how you know it’s done right.
✅ 4. Sand and Apply Second/Third Coats
- Use a sanding sponge to smooth out bumps and ridges.
- Apply a wider second coat using a 12″ knife.
- Feather out further with each coat to blend seamlessly.
In our process, tape edges vanish into the wall. I’ve reviewed videos where even in slow motion you can’t tell where the seam was. It’s all in how you build up the coats and sand in between.
✅ 5. Prime and Paint
Once the wall is perfectly smooth:
- Apply primer over the patch.
- Then paint to match the surrounding wall.
🖌️ Skipping primer is a mistake — it leads to flashing and texture mismatch. We never skip it, and the finish is flawless every time.
Common Mistakes When Fixing Drywall Tape
Many DIY attempts at fixing tape on drywall fail because of avoidable errors:
- Using too much compound, leading to bumps and ridges.
- Not removing damaged tape before applying new tape.
- Working with poor-quality tools, leaving rough edges.
- Skipping proper drying time, which causes bubbles or peeling.
A careful approach with thin, even layers and correct drying intervals will produce a professional-looking result.
Why This Step Is Essential for Long-Lasting Walls
Properly fixed drywall tape prevents cracks from returning and keeps walls looking fresh for years. It’s an essential step whether you’re building new walls, remodeling, or making spot repairs. By choosing the right tape, compound, and technique, you ensure that your finish remains seamless and durable.
🧠 Final Thoughts: Speed, Skill, and Invisible Tape
Using drywall repair tape correctly isn’t just about following steps — it’s about the finish. Whether you’re patching a crack or fixing a full seam, doing it cleanly and smoothly is the difference between a visible patch and a wall that looks brand new.
I’ve watched our crew work, and honestly, they’re so skilled and quick, it’s hard to keep up visually. When the job’s done, you can’t even tell where the tape was placed. That’s the level we aim for — and with practice, you can get close too.
🧩 FAQs: Drywall Taping Done Right
❓ Can I just use spackle instead of drywall tape?
No — tape adds strength. Spackle alone will crack over time, especially in seams or larger holes.
❓ Why is my drywall tape cracking or showing?
Likely due to poor adhesion or insufficient mud. This is why precise application matters — I’ve seen flawless results when things are done right from the first pass.
❓ How long does it take to do a full repair?
With our team? Incredibly fast — but that’s after hundreds of jobs. For a DIYer, expect 2–3 days including drying time.