
Not all wall damage can be patched. Sometimes, the smartest move is to replace the drywall entirely.
If your walls are warped, crumbling, or water-damaged—or if you’re facing years of patch-over-patch repairs—it’s time to stop hiding the problem. Drywall replacement gives your home a clean slate, improves structural integrity, and prepares the surface for new paint or texture that lasts.
At Jaime’s Construction & Remodeling, we provide professional drywall and sheetrock replacement services in Tyler, TX and surrounding East Texas communities. Let’s break down when replacing is better than patching—and how we do it right.
When Is Drywall Replacement Better Than Repair?
Patching works great for small holes and minor damage. But sometimes, the damage runs deeper.
You may need drywall replacement instead of a simple repair if:
- The wall has been repaired multiple times and looks uneven
- There’s water damage, moisture stains, or bubbling
- You notice mold or a musty smell inside the wall
- The drywall is sagging, bulging, or crumbling
- You’re remodeling and want a clean finish with no seams
- Electrical or plumbing work left large holes or open panels
In these cases, patching will only delay the problem. Replacing the entire sheet of drywall ensures a solid, long-term solution.
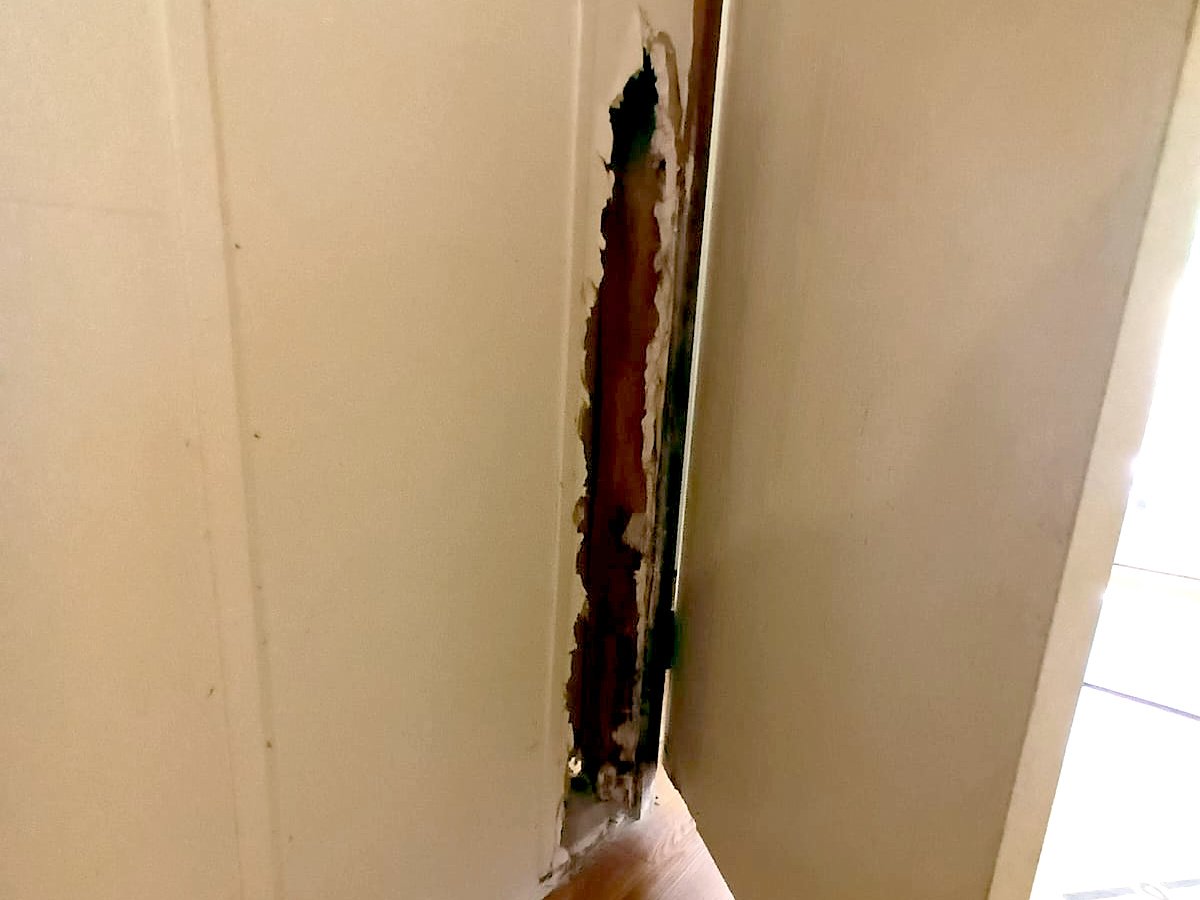
Signs You Need to Replace Sheetrock, Not Just Patch
Not all wall damage can be fixed with a simple patch. If your sheetrock is crumbling, stained, or sagging, you may need a full replacement. This is where working with a professional drywall contractor makes all the difference. Find out what a drywall contractor can do for your home →
Not sure if it’s time to replace? Look for these telltale signs:
- Persistent cracks that keep reappearing
- Soft spots when pressing on the wall
- Brown or yellow water stains on the ceiling or wall
- Wavy or buckling drywall surface
- Evidence of black spots (possible mold)
- Rotten smell or drywall peeling apart in layers
If you’re experiencing any of these symptoms, it’s best to call a local expert for a full inspection. At Jaime’s, we’ll give you a clear recommendation—no pressure, no upsell.
Our Sheetrock Replacement Process
Replacing drywall is more than cutting out a sheet and screwing in a new one. Here’s how we do it:
1. Damage Assessment
Before any removal or replacement begins, our first crucial step is a thorough damage assessment. This goes beyond the visible surface damage to identify potential underlying issues that could compromise the new drywall installation or lead to future problems.
During this assessment, we carefully inspect the affected area for:
- Hidden Moisture: Using moisture meters, we check for elevated moisture levels within the drywall, insulation, and framing. This helps identify active leaks (plumbing, roof, window, or HVAC) or areas where water has accumulated, even if the visible surface appears dry. Addressing the source of moisture is paramount to prevent recurrence of damage.
- Mold Growth: Moisture often leads to mold. We look for visual signs of mold (discoloration, fuzzy growth) on the drywall, framing, and insulation. Even if not immediately visible, a musty odor can indicate hidden mold. If mold is detected, proper containment and remediation protocols will be initiated before proceeding with drywall removal.
- Structural Issues: We examine the surrounding framing (studs, joists, headers) for any signs of compromise such as rot, warping, cracking, or pest damage. Compromised framing can affect the integrity and stability of the new drywall, and requires repair or replacement to ensure a safe and durable installation.
This comprehensive assessment ensures that all root causes of the drywall damage are identified and addressed, providing a solid and safe foundation for the replacement process.
2. Safe Removal

Following a thorough damage assessment, the next critical step is the safe and controlled removal of the compromised drywall. Our technicians meticulously perform this process to prevent further damage to the surrounding structure and to ensure the safety of the work environment.
Our process for safe removal includes:
- Establishing a Safe Zone: Before any cutting begins, we ensure the area is clear of obstructions and, if necessary, power to affected electrical outlets or switches is shut off at the breaker. We also lay down protective coverings to contain dust and debris.
- Precision Cutting: Using specialized drywall cutting tools, we carefully make precise cuts around the damaged section. Our goal is to remove only the necessary portions of the drywall, minimizing the size of the patch while ensuring all compromised material is extracted. We pay close attention to cutting along existing studs or joists where possible, to facilitate easier reinstallation.
- Protection of Hidden Elements: During the cutting and removal process, extreme care is taken to avoid disturbing or damaging:
- Electrical Wiring: We constantly monitor for hidden wires behind the drywall. If wires are encountered, they are carefully moved aside or protected as needed, without cutting or nicking their insulation.
- Insulation: Existing insulation is handled gently to prevent unnecessary displacement or damage. If the insulation itself is wet or moldy from the initial damage, it will be safely removed as well.
- Framing: Our cuts are planned to avoid scoring, cutting, or otherwise compromising the structural integrity of the wooden or metal framing behind the drywall.
- Controlled Demolition & Disposal: Removed drywall pieces are carefully pulled away from the wall or ceiling to prevent large sections from falling unexpectedly. All damaged sheetrock and associated debris (like wet insulation or moldy material) are immediately placed into heavy-duty bags and properly disposed of according to local regulations.
This meticulous approach to removal ensures a clean work area and a prepared opening, setting the stage for a precise and durable new drywall installation.
3. Precision Installation

With the damaged material safely removed and the underlying structure inspected, the next critical phase is the precision installation of the new drywall panels. This step requires meticulous attention to detail to ensure the new section seamlessly integrates with the existing structure, providing a smooth and stable surface for finishing.
Our approach to precision installation includes:
- Accurate Measurement: We take precise measurements of the opening, accounting for any slight irregularities in the framing. This ensures the new drywall panel is cut to the exact dimensions required for a tight and secure fit.
- Careful Cutting: Using specialized tools, the new drywall panel is cut cleanly and accurately. Whether it’s a simple rectangle or involves cuts around electrical boxes, pipes, or vents, we ensure all openings are precisely cut to align perfectly with the rough-ins in the wall.
- Perfect Fit and Alignment:
- The new panel is carefully positioned into the opening, ensuring it sits flush with the surrounding existing drywall. We check for any protrusions or recessed areas.
- We verify that the edges of the new panel align perfectly with the center of the underlying framing (studs or joists) to provide adequate backing for secure attachment. This also ensures that the joints will be strong and easy to finish.
- Secure Mounting: Drywall screws are strategically driven into the framing members, typically every 6-8 inches along the studs, paying attention to the manufacturer’s recommended spacing and avoiding over-driving the screws. This creates a strong, stable attachment that prevents future movement, cracks, or bulging. We ensure all fasteners are slightly recessed below the paper surface without tearing it.
This meticulous installation process is fundamental to the structural integrity and aesthetic quality of the final repair, creating a robust foundation for the subsequent finishing stages.
4. Taping & Mudding

Once the new drywall panel is precisely installed, the next critical phase involves taping and “mudding” (applying joint compound). This multi-stage process is where the seams between the new and existing drywall disappear, creating a perfectly smooth and continuous surface ready for primer and paint.
Our meticulous taping and mudding process includes:
- Taping the Seams:
- We first apply drywall joint tape (either paper tape embedded in compound or self-adhesive mesh tape) directly over all seams where the new drywall meets the old.
- For paper tape, it is pressed firmly into a thin layer of freshly applied joint compound, ensuring no air bubbles are trapped underneath. Mesh tape is simply adhered directly to the seam. This tape provides crucial reinforcement, preventing cracks along the joints.
- Applying Multiple Coats of Joint Compound (Mudding):
- First Coat (Bed Coat): A thin, even layer of joint compound is applied over the tape, pressing it firmly to fill the seam and embed the tape completely. This coat also covers the screw heads. We ensure this layer is smooth but do not aim for perfection at this stage.
- Drying Time: Each coat is allowed to dry completely. This is crucial for proper adhesion and to prevent cracking or shrinking. Depending on the thickness of the application and ambient humidity (especially relevant in Tyler’s summer climate), this can take several hours, often overnight.
- Second Coat (Fill Coat): Once the first coat is dry, a slightly wider and often thicker layer of joint compound is applied. This coat helps to further smooth out the seam and fill any minor imperfections from the first coat.
- Third Coat (Finish Coat): After the second coat dries, a final, very thin and wide coat is applied. This is the “skim coat” designed to achieve ultimate smoothness and blend the repair seamlessly into the surrounding wall.
- Feathering the Edges: With each successive coat of joint compound, we strategically widen the application area and feather the edges. This technique involves gradually thinning the joint compound as it extends outward from the seam onto the existing wall, making the transition virtually imperceptible. This prevents obvious lines or humps where the patch meets the original drywall.
This detailed taping and mudding process, with careful drying times between coats, is essential for creating a durable, crack-resistant, and visually seamless repair.
5. Sanding, Texturing & Painting

This final stage brings the drywall repair to a completely finished state, making the patched area indistinguishable from the rest of the wall. Our meticulous approach ensures a seamless aesthetic outcome.
This step involves:
- Sanding Smooth:
- Once all coats of joint compound are thoroughly dry (which, especially given the humidity in Tyler during July, we ensure is complete before proceeding), we meticulously sand the patched area.
- We use progressively finer-grit sandpaper (typically starting with 120-150 grit and finishing with 180-220 grit) to smooth out any ridges, bumps, or imperfections.
- The goal is to achieve a surface that is perfectly flush and seamless with the surrounding existing drywall. We constantly check the smoothness by hand and with angled lighting to detect any remaining inconsistencies.
- After sanding, all dust is thoroughly wiped away with a damp cloth to ensure a clean surface for the next steps.
- Matching the Existing Wall Texture:
- For walls with texture (such as orange peel, knockdown, or popcorn), this is a critical step. If your wall is smooth, this step is skipped.
- Our experienced technicians precisely apply a texture spray or compound to the sanded patch, mimicking the existing texture of your wall. This often involves specific spray techniques and distances to achieve the correct pattern and density.
- We take great care to blend the new texture perfectly into the surrounding old texture, ensuring the repaired area is visually integrated.
- The applied texture is allowed to dry completely before any further steps.
- Priming & Painting:
- Priming: A high-quality primer is applied over the entire patched and, if applicable, textured area. This is essential because joint compound is very porous and absorbs paint differently. Primer seals the surface, ensuring uniform paint absorption and preventing “flashing” (dull spots) and variations in sheen in the final paint job.
- Painting: Once the primer is dry, we apply matching paint to the repaired section. We are experts at color matching and can either use existing paint supplied by the client or precisely match the current wall color using samples, if needed. We apply the paint in thin, even coats, allowing adequate drying time between coats, until the repair is fully covered and blended seamlessly with the surrounding wall. For older or sun-faded walls, painting the entire wall from corner to corner may be recommended to ensure the best color uniformity.
Through this comprehensive finishing process, your drywall replacement will be not just structurally sound, but also visually flawless, making the damage a thing of the past.
6. Cleanup & Final Walkthrough

Our commitment to excellence extends beyond the repair itself to ensuring your complete satisfaction and leaving your home spotless. This final step guarantees that the only trace of our work is a perfectly restored wall.
This crucial final phase includes:
- Thorough Cleanup:
- Before concluding the project, our team conducts a comprehensive cleanup of the entire work area. This involves:
- Removing all tools, equipment, and protective coverings (drop cloths, plastic sheeting).
- Collecting and properly disposing of all drywall scraps, dust, and debris.
- Using industrial-grade vacuums equipped with HEPA filters to effectively capture fine drywall dust from floors, surfaces, and even the air, minimizing airborne particles.
- Wiping down any surfaces that may have accumulated dust, such as baseboards, windowsills, or nearby furniture.
- Our aim is to leave your home as clean, if not cleaner, than when we arrived.
- Before concluding the project, our team conducts a comprehensive cleanup of the entire work area. This involves:
- Final Walkthrough:
- Once the cleanup is complete, a final walkthrough is conducted with you, the homeowner or client.
- During this walkthrough, we carefully review the entire repaired area together, ensuring that:
- Your walls look new: The patched area is completely seamless, smooth, and perfectly matched in texture and paint to the surrounding wall. There should be no visible signs that a repair was ever made.
- All work meets your expectations and our high quality standards.
- Any questions or concerns you may have are addressed immediately.
- Peace of Mind:
- Our meticulous process, from initial damage assessment to the final cleanup and walkthrough, is designed to provide you with complete peace of mind. You can rest assured that your drywall repair is not just a cosmetic fix, but a durable, high-quality restoration that will last.
With our comprehensive approach, your home remains clean, your walls look new, and you gain the lasting peace of mind that comes with a professionally executed and guaranteed repair.
Benefits of Hiring a Local Drywall Replacement Contractor
Sure, you could try to DIY. But replacing sheetrock isn’t a weekend project—it’s heavy, messy, and requires serious precision.
Working with a professional drywall replacement contractor in Tyler ensures:
- ✅ Straight, level wall installation
- ✅ Invisible seams and smooth transitions
- ✅ Proper handling of electrical boxes or plumbing lines
- ✅ Accurate texture and paint blending
- ✅ Faster turnaround and zero stress
If you’re searching for drywall replacement near me, we’re your trusted local team—serving Tyler, Whitehouse, Lindale, Flint, Bullard, and nearby East Texas towns.
Common Causes of Severe Drywall Damage in East Texas
Living in East Texas comes with its own set of challenges. The most frequent reasons we see full drywall replacements include:
- Foundation shifting causing large cracks or seam separation
- Roof or plumbing leaks leading to soaked or moldy drywall
- Storm damage or flooding from seasonal weather
- Old repairs done poorly that no longer hold up
- Pest damage in garage or attic walls
If your home has experienced any of the above, replacing damaged sheetrock is often the safest and cleanest option.
Call for Professional Drywall Replacement in Tyler
Don’t live with damaged, unstable, or unsightly walls.
📞 Call Jaime’s Construction & Remodeling today at 903‑245‑5824 for expert drywall replacement in Tyler, TX and surrounding East Texas communities.
🛠️ We handle everything—from demo to cleanup—with care, precision, and a satisfaction guarantee.
Need help deciding between patching and replacing? Let’s take a look. We’ll give you an honest answer and a fair price.